 Like most digital historians, my personal computer is packed to the gills with thousands upon thousands of documents in myriad formats and containers: JPEG, PDF, PNG, GIF, TIFF, DOC, DOCX, TXT, RTF, EPUB, MOBI, AVI, MP3, MP4, XLSX, CSV, HTML, XML, PHP, DMG, TAR, BIN, ZIP, OGG. Well, you get the idea. The folder for my dissertation alone contains almost 100,000 discrete files. As I mentioned last year, managing and preserving all of this data can be somewhat unwieldy. One solution to this dilemma is to do our work collaboratively on the open web. My esteemed colleague and fellow digital historian Caleb McDaniel is running a neat experiment in which he and his student assistants publish all of their research notes, primary documents, drafts, presentations, and other material online in a wiki.
Although I think there is a great deal of potential in projects like these, most of us remain hopelessly mired in virtual reams of data files spread across multiple directories and devices. A common issue is a folder with 200 JPEGs from some archival box or a folder with 1,000 PDFs from a microfilm scanner. One of my regular scholarly chores is to experiment with different ways to sort, tag, manipulate, and combine these files. This time around, I would like to focus on a potential solution for the latter task. So if, like most people, you have been itching for a way to compile your entire communist Christmas card collection into a single handy document, today is your lucky day. Now you can finally finish that article on why no one ever invited Stalin over to their house during the holidays.
Combining small numbers of image files or PDFs into larger, multipage PDFs is a relatively simply point-and-click operation using Preview (for Macs) or Adobe Acrobat. But larger, more complex operations can become annoying and repetitive pretty quickly. Since I began my IT career on Linux and since my Mac runs on a similar Unix core, I tend to fall back on shell scripting for exceptionally complicated operations. The venerable, if somewhat bloated, PDFtk suite is a popular choice for the programming historian, but there are plenty of other options as well. I’ve found the pdfsplit and pdfcat tools included in the latter package to be especially valuable. At the same time, I’ve been trying to use the Mac OS X Automator more often, and I’ve found that it offers what is arguably an easier, more user friendly interface, especially for folks who may be a bit more hesitant about shell scripting.
What follows is an Automator workflow that takes an input folder of JPEGs (or PDFs) and outputs a single combined PDF with the same name as the containing folder. It can be saved as a service, so you can simply right-click any folder and run the operation within the Mac Finder. I’ve used this workflow to combine thousands of research documents into searchable digests.
Step 1: Open Automator, create a new workflow and select the “Service” template. At the top right, set it to receive selected folders in the Finder.
Step 2: Insert the “Set Value of Variable” action from the library of actions on the left. Call the variable “Input.” Below this, add a “Run Applescript” action and paste in the following commands:
on run {input}

tell application "Finder"

set FilePath to (container of (first item of input)) as alias

end tell

return FilePath

end run
Add another “Set Value of Variable” action below this and call it “Path.” This will establish the absolute path to the containing folder of your target folder for use later in the script. If this is all getting too confusing, just hang it there. It will probably make more sense by the end.
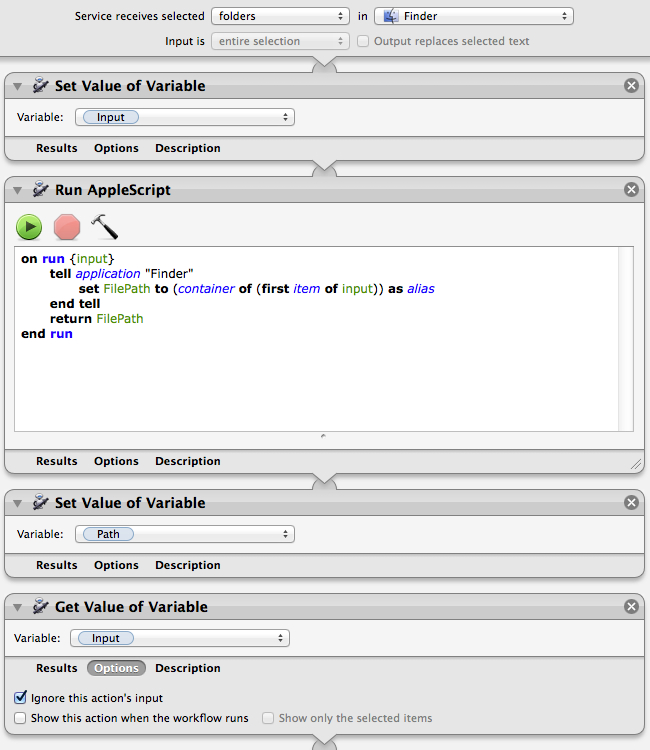 Step 3: Add a “Get Value of Variable” action and set it to “Input.” Click on “Options” on the bottom of the action and select “Ignore this action’s input.” This part is crucial, as you are starting a new stage of the process.
Step 4: Add the “Run Shell Script” action. Set the shell to Bash and pass input “as arguments.” Then paste the following code:
echo ${1##*/}
I admit that I am cheating a little bit here. This Bash command will retrieve the title of the target folder so that your output file is named properly. There is probably an easier way to do this using Applescript, but to be honest I’m just not that well versed in Applescript. Add another “Set Value of Variable” action below the shell script and call it “FolderName” or whatever else you want to call the variable – it really doesn’t matter.
Step 5: Add another “Get Value of Variable” action and set it to “Input.” Click on “Options” on the bottom of the action and select “Ignore this action’s input.” Once again, this step is crucial, as you are starting a new stage of the process.
Step 6: Add the action to “Get Folder Contents,” followed by the action to “Sort Finder Items.” Set the latter to sort by name in ascending order. This will assure that the pages of your output PDF are in the correct order, the same order in which they appeared in the source folder.
Step 7: Add the “New PDF from Images” action. This is where the actual parsing of the JPEGs will take place. Save the output to the “Path” variable. If you don’t see this option on the list, go to the top menu and click on View –> Variables. You should now see a list of variables at the bottom of the screen. At this point, you can simply drag and drop the “Path” variable into the output box. Set the output file name to something arbitrary like “combined.” If you want to combine individual PDF files instead of images, skip this step and scroll down to the end of this list for alternative instructions.
Step 8: Add the “Rename Finder Items” action and select “Replace Text.” Set it to find “combined” in the basename and replace it with the “FolderName” variable. Once again, you can drag and drop the appropriate variable from the list at the bottom of the screen. Save the workflow as something obvious like “Combine Images into PDF,” and you’re all set. When you right-click on a folder of JPEGs (or other images) in the Finder, you should be able to select your service. Try it out on some test folders with a small number of images to make sure all is working properly. The workflow should deposit your properly-named output PDF in the same directory as the source folder.
To combine PDFs rather than image files, follow steps 1-6 above. After retrieving and sorting the folder contents, add the “Combine PDF Pages” action and set it to combine documents by appending pages. Next add an action to “Rename Finder Items” and select “Name Single Item” from the pull-down menu. Set it to name the “Basename only” and drag and drop the “FolderName” variable into the text box. Lastly, add the “Move Finder Items” action and set the location to the “Path” variable. Save the service with a name like “Combine PDFs” and you’re done.
This procedure can be modified relatively easily to parse individually-selected files rather than entire folders. A folder action worked best for me, though, so that’s what I did. Needless to say, the containing folder has to be labeled appropriately for this to work. I find that I’m much better at properly naming my research folders than I am at naming all of the individual files within them. So, again, this process worked best for me. A lot can go wrong with this workflow. Automator can be fickle, and scripting protocols are always being updated and revised, so I disavow any liability for your personal filesystem. I also welcome any comments or suggestions to improve or modify this process.